How to Make a Lamp Shade from Oven Melted PlasticM
M
In 19 Cool Hand Drawn Steps
uber upcycling

Learn how to make an elegant designer lamp shade from melted plastic disposable party bowls!
And that’s no easy task, because plastic tends to always look like… well, plastic! But I think you’ll agree, this shade looks good enough to be sold in a shop!
Step by Step Guide
If you’d like to try your hand at making your own melted plastic lamp shade, here’s some detailed instructions.

Step 1: Use scissors to trim the rims off eight clear plastic disposable bowls.
Step 2: Use a craft knife to cut a hole in all the bases.
Step 3: Take what’s left of each bowl and cut thin strips around the sides, leaving a gap at the top.

Step 4: U Rest each bowl on a drinking glass and heat in the oven until the strips go wavy, I went for 90secs at 170°C.

Step 6: Cut the sides of the bowls into a series of short sections.
Step 7: Trim off the rims using scissor.

Step 8: Take a 2 litre soda bottle and cut out a section using a craft knife.
Step 9: Glue the wavy short sections around the straight section using hot glue, working your way up from the bottom, overlapping each row as you go.

Step 10: Place the shade onto a piece of tin (I got mine from an old biscuit tin) and draw around the inside with a pencil or pen.
Step 11: Draw another circle 6mm outside of the traced circle, and cut it out using tin snips.
Step 12: Snip the edges into short tabs, going no further than the traced circle.
Step 13: Bend the tabs down using pliers.

Step 14: Use sand paper to remove the paint from the surface of the lid. Push the lid down into the shade
Step 15: Secure it with blobs of hot glue.
Step 16: Cut a 6mm strip of tin, long enough to wrap around the shade. Remove the paint using sandpaper and hot glue it around the outside of the shade.

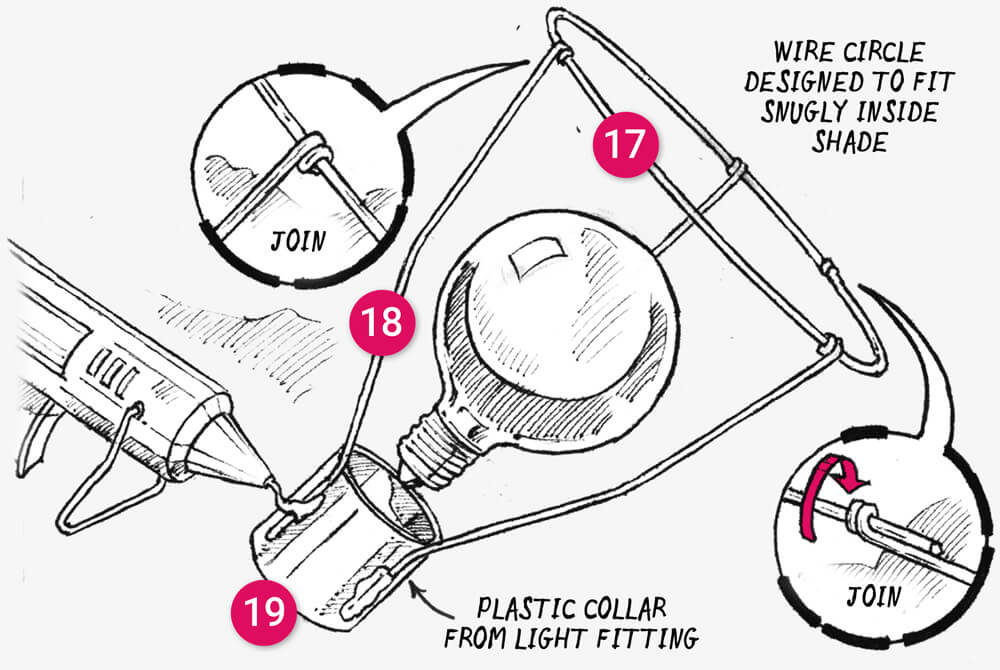
Step 17: Use wire (1.5mm galvanised) to make the shade support. Create a ring large enough to fit snugly in the shade, and join the ends by using pliers to twist one end around the other, see diagram.
Step 18: Use more wire to create three connecting struts. Join one end of each strut to the ring, by using pliers to tightly wrap it around the ring.
Step 19: Connect the other end of each strut to the plastic collar from a light fitting, using hot glue secure it into position.
To fit the shade screw the plastic collar onto the light fitting and then simply rest the shade onto the wire ring.
Materials List
- Old biscuit/sweet tin
- 8 disposable plastic party bowls
- 2 litre plastic soda bottle
- Glue gun
- Craft knife and scissors
- Pencil or pen
- Tins snips and pliers
- 1.5mm thick wire
Please note: Because the light shade is made of plastic I’d advise using a low energy bulb – one that doesn’t get too hot.
Creative Takeaway
This technique for ‘melting’ plastic can create lots of amazing effects. Try experimenting with different types of plastic… some will almost melt, others like the bowls used above, simply warp and twist.