
How to Make an Elegant Tea Light Holder From a Tin CanM
M
In 14 Cool Hand Drawn Steps
uber upcycling

This elegant tea light holder is one of the best tin can transformations on the web… if I say so myself!
Luckily, it’s also moderately easy to make, so go have a tin of baked beans for lunch and then follow the instructions below!
Step by Step Guide
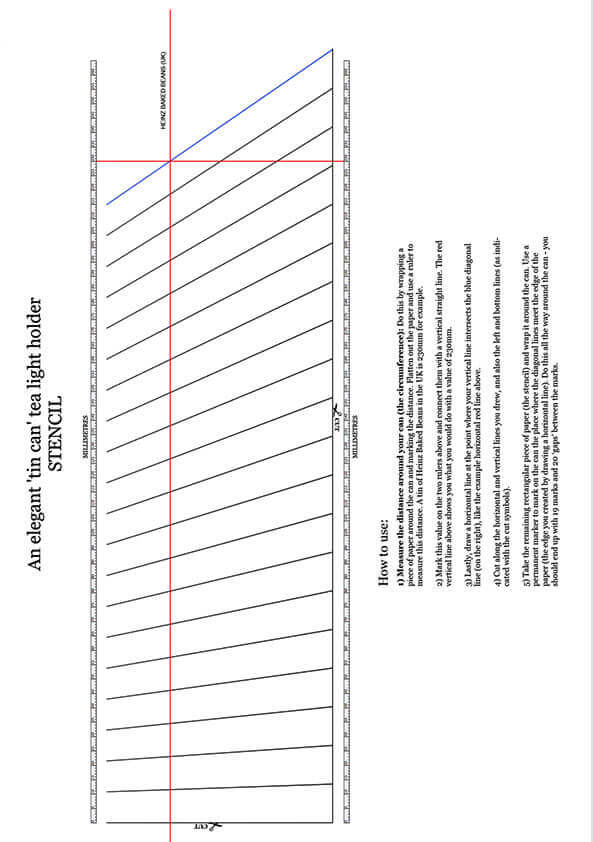
Before you get started on your tin can tea light holder, sign-up below and download the printable stencil, it will save you some time.

Step 1: Take the empty tin can and peel off the label… but hold onto the lid, you’ll need that later.
Step 2: Use tin snips (preferably compound lever tin snips) to cut around and remove the rim at the top of the tin can.

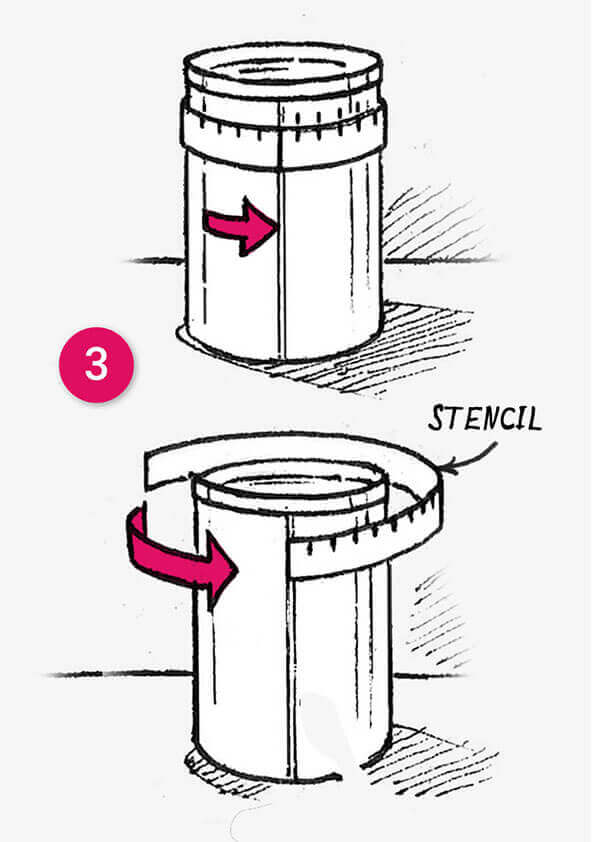
Step 3: If you haven’t downloaded the free stencil, here’s how to make one: Cut a thin strip of paper equal in length to the circumference of the can. Measure the length of the strip, divide the length by 20, and use this measurement to make 19 equidistant marks along the strip.

Step 4: Wrap the stencil around one end of the can, use the seam as the starting point, this will help keep everything vertical. Use a permanent marker to make a series of marks on the tin can inline with the marks on the stencil.

Step 5: Slide the stencil to the other end of the tin can, making sure it’s still aligned with the seam.
Step 6: Repeat the previous step. Use a ruler to join the two sets of marks, creating 19 vertical lines - draw a 20th line along the seam.

Step 7: The next step is easy… snip along the lines using the tin snips!

Step 8: Orient the tin can so the base (or bottom) is on top and then bend every alternate strip upwards.

Step 9: To make the feet, curl the ‘bottom’ strips tightly around a pencil and then release… they should spring open to create the spiral shape shown above. If they don’t, roll them again or try adjusting them by hand.

Step 10: Now, shape the ‘top’ strips by using pliers to add two folds towards each end, and then by curving the central section, as shown above.

Step 11: Place a tea light onto the centre of the lid and draw around it with a permanent marker.
Step 12: Cut the disc out using tin snips.

Step 13: The next step is a bit fiddly. Overlap the ends of the top strips, in an alternating fashion (if they are too long trim them) and then apply hot glue to secure them.
Step 14: Finally, glue the disc into the centre using more hot glue.
You can now add your tea light and admire your handywork!
Materials List
- One tin can
- A pair of aviation snips
- Marker pen
- Ruler
- Pliers
- Hot glue gun
Creative Takeway
Tin cans are a valuable free craft resource, with a bit of imagination they can be turned into something as good as you could find in a shop.
